Saturday, July 12, 2014

Engineering Drawing - Part 6

3D CAD & Solid Modelling


CAD technology.

Computer Aided Drafting or Design offers several methods of representing the design model:

2D - Lines and text, similar to conventional drawing board.
3D - Vertices (corners or points in space), edges, surfaces in x, y and z.
Solid modelling - Solid geometry, fully defined three dimensional solid shapes, with free-form curved faces, material and mass properties.

Different methods suit different design circumstances. This section will introduce you to the most significant and expanding technology, Solid Modelling.

The graph below gives a very crude indication of the productivity of companies developing CAD software, through time.

All of the acronyms below may be used in the context of mechanical computer aided engineering:

CAD - Computer Aided Design/Drafting
MCAD - Mechanical Computer Aided Design
CAE - Computer Aided Engineering

Part modelling

You can create 3D solid part models of your designs, such as this connecting rod. The dimensions that define the model are related to each other and can be changed and controlled. So, if you change one dimension, others will change with it. Software that allows this is refereed to as parametric. For example, change the centre distance of the bores of this connecting rod and the whole model will stretch out.

You can also assign material properties, analyse mass properties, control the colour and texture of the appearance, create photo realistic images with lighting, shadows and perspective.


Orthographic drawing


From the 3D model you can also create a detailed orthographic projection drawing. You can easily modify the design. Because the solid part file and the drawing file are connected, or associated with each other, a change in one will appear in the other. Change a dimension in the solid part and the same dimension will be updated in the drawing.

Most market leading solid modelling software offers this associativity and is usually referred to as 3D parametric associative solid modelling software.

Assembly modelling


Solid model parts can be assembled. The assembly files can enjoy the same associativity as do part and drawing files. The connecting rod above has been assembled here with a crank shaft and a piston.


Analysing your design


Having created a 3D solid model of a component, the geometry can then be used to predict how it may behave in real life.

For example:
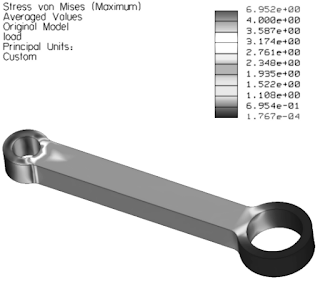
To predict how high the stresses may be and how much the connecting rod may deflect under load, CAD software can be used to apply loads and supports and then analyse the structural behaviour of the model.

As the design engineer, you can use the analysis results to help you decide whether the design is acceptable or requires modification. You may decide for the connecting rod , that the stresses are too high around the small end and modify the design accordingly. You run the analysis again, continuing the process until the predicted stress values are acceptable.

Visualise your design


As time passes more and more 3D CAD software packages allow you to create high quality photorealistic images of your designs. By setting up an environment, with surrounding walls, a floor and a ceiling, lights, surface textures, etc. you can capture impressive images that cast shadows and reflections, giving a much more realistic impression of what your design may look like once manufactured. These facilities provide very powerful tools for developing, communicating and selling design ideas.

Most consumer product designs are modelled using 3D CAD software and then photo rendered as part of the product development process. Most public building designs now are also treated in the same way.


Friday, July 11, 2014

Engineering Drawing - Part 5

Tolerances, limits and fits

In order to ensure that assemblies function properly their component parts must fit together in a predictable way. As mentioned in section 2.5, no component can be manufactured to an exact size, so the designer has to decide on appropriate upper and lower limits for each dimension.

Accurately toleranced dimensioned features usually take much more time to manufacture correctly and therefore can increase production costs significantly. Good engineering practice finds the optimum balance between required accuracy for the function of the component and minimum cost of manufacture.


Dimension tolerances


If a dimension is specified, in millimeters, as 10 ± 0.02, the part will be acceptable if the dimension is manufactured to an actual size between 9.98 and 10.02 mm. Below are some examples of ways of defining such limits for a linear dimension.

To give you a feel for the magnitude of decimal values in mm, consider these facts:

The thickness of the paper this page is printed on is approximately 0.100 mm.

Average human hair thickness is approximately 0.070 mm.

The human eye cannot resolve a gap between two points smaller than about 0.020mm, at a 20cm distance.

If you raise the temperature of a 100mm long block of steel by 10ºC it will increase in length by approximately 0.020mm.


General tolerancing


General tolerance notes apply tolerances to all unspecified dimensions on a drawing. They can save time and help to make a drawing less cluttered. Examples are shown below.

Some examples of general tolerance notes

Limits and fits for shafts and holes


Basic size and shaft/hole tolerancing systems


The basic size or nominal size is the size of shaft or hole that the designer specifies before applying the limits to it. There are two systems used for specifying shaft/hole
tolerances:

Basic hole system: Starts with the basic hole size and adjusts shaft size to fit.


Basic shaft system: Starts with the basic shaft size and adjusts hole size to fit.


Because holes are usually made with standard tools such as drills and reamers, etc, the basic hole system tends to be preferred and will therefore be used here.


Fit


The fit represents the tightness or looseness resulting from the application of tolerances to mating parts, e.g. shafts and holes. Fits are generally classified as one of the
following:

Clearance fit: 
  • Assemble/disassemble by hand.
  • Creates running & sliding assemblies, ranging from loose low cost, to free-running high temperature change applications and accurate minimal play locations.

Transition fit: 
  • Assembly usually requires press tooling or mechanical assistance of some kind.
  • Creates close accuracy with little or no interference.

Interference fit: 
  • Parts need to be forced or shrunk fitted together.
  • Creates permanent assemblies that retain and locate themselves.


ISO limits and fits


Fits have been standradised and can be taken directly from those tabulated in the BS 4500 standard, 'ISO limits and fits.'

The BS 4500 standard refers to tolerance symbols made up with a letter followed by a number. The BS Data Sheet BS 4500A, as shown on the following two pages, shows a range of fits derived, using the hole basis, from the following tolerances:
Holes:
H11
H9
H8
H7

Shafts:
c11
d10
e9
f7
g6
k6
n6
p6
s6
Remember:
  • Capital letters always refer to holes, lower case always refer to shafts.
  • The greater the number the greater or wider the tolerances.
The selection of a pair of these tolerances will give you the fit. The number of possible combinations is huge. BS 4500 helps to standardize this and offers a range of fits suitable for most engineering applications.

Selected ISO Fits - Hole Basis. Extract from BS 4500, data Sheet 4500A.

Selected ISO Fits - Hole Basis. Extract from BS 4500, data Sheet 4500A.

ISO limits and fits, determining working limits


Consider an example of a shaft and a housing used in a linkage:

Type of fit:                                     
'Normal' clearance fit.
Basic or Nominal size:                  
φ40mm

We will determine the actual working limits, the range of allowable sizes, for the shaft and the hole in the housing.

Look along the bottom of the ISO Fits Data Sheet 4500A and locate 'Normal Fit'. We will use this pair of columns to extract our tolerances.

The tolerances indicated are:

1st column
H8
for the hole   (upper case H)
2nd column
f7
for the shaft  (lower case f)

The actual tolerances depend upon the basic, or nominal, diameter as well as the class of fit. So, locate 40mm in the left hand Nominal Sizes column. Either the 30 - 40 or 40 - 50 range is acceptable in this case. Read across and note the tolerance values for the hole and the shaft, as shown below.


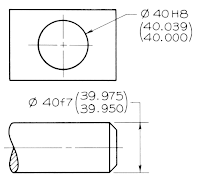
For the hole diameter we have a tolerance of: +0.039mm   -0.000mm
For the shaft diameter we have a tolerance of: -0.025mm   -0.050mm

These tolerance values are simply added to the nominal size to obtain the actual allowable sizes.

Note that this is a clearance fit. As long as the hole and shaft are manufactured within the specified tolerances the hole will always be either slightly oversize or spot on the nominal size and the shaft will always be slightly under-size. This ensures that there will always be a free clearance fit.

These tolerances may be expressed on a drawing in several ways:


1) Simply as the nominal size with the tolerance class.

This is not always preferred as the machine operator has to calculate the working limits.


2) The nominal size with the tolerance class as above with the calculated working limits included.


3) The calculated working limits only.


Tabulated guide to types of ISO limits and fits


Assembly drawings


Assembly drawings can be used to:
  • Name, identify, describe and quantify all of the components making up the assembly.
  • Clearly show how all of the components fit together.
  • Indicate all of the required fasteners.
  • Record any special assembly instructions.
  • Record any other relevant information.
Here is an example:


Note the use of sections, item numbers neatly laid out and the parts list.

Drawing checklist

It is easy to accidentally omit various items when creating engineering detail drawings. Before passing on your work it is recommended that you work through the checklist below for each drawing:

The general drawing:

  1. Do projections conform to the relevant conventions, usually 1st or 3rd angle?
  2. Have you used the minimum number of views necessary to accurately show the information required?
  3. Are the views laid out in appropriate positions relative to the size of paper?
  4. Has the title box been completed, particularly: 
    • Drawn by
    • Name of component
    • Date
    • Projection (1st or 3rd angle)
    • Paper size
    • Scale
  5. If required, has the material been specified?

The geometry details:

  1. Check to make sure that there are sufficient dimensions to manufacture the component. Check that positions and sizes of any features, such as holes, are clearly dimensioned.
  2. No dimension should appear more than once on the drawing, do any?
  3. Have the dimensions been laid out in consistent and clear positions, so that they are easy to read.
  4. Have all of the dimension lines been constructed with correct extension lines and gaps?
  5. Are the arrow heads all in the same style and the same size?
  6. Have dimensions relating to a particular feature, such as a hole, been grouped together on one view, if possible?
  7. Have appropriate line styles and line weights been used?
  8. Have any surface finish requirements been specified?
  9. Have any explicit tolerance requirements been specified?
  10. Have any required center lines, break lines, etc. been used?
  11. Have any required general notes been added, such as additional general tolerances, finish specifications or specification of special manufacturing processes?
  12. If sections have been used do they conform to drawing conventions?


Thursday, July 10, 2014

Engineering Drawing - Part 4

Dimensions

A drawing from which a component is to be manufactured must communicate all of the required information by:

  • describing the form or shape of the component, usually by using orthographic and sometimes pictorial views...
  • giving actual dimensions of all features of the geometry...
  • giving information about any special manufacturing processes and materials required.

The design engineer should have a good understanding of projection methods, dimensioning methods and the manufacturing methods to be used.

This section introduces some basic guidelines and examples to help explain the general rules of dimensioning, based on BS 8888.


General rules


  • Standards and conventions should be followed.
  • Dimensions should be placed on drawings so that they may be easily read.
  • The drawing must include the minimum number of dimensions required to accurately manufacture th edesign.
  • A dimension should not be stated more than once, unless it aids communication.
  • It should not be necessary for the operator manufacturing the component to have to calculate any dimensions.


Types of dimension

Types of dimensioning can be broadly classified as:

  • Size dimensions. Used to describe heights, widths, diameters, etc.
  • Location dimensions. Used to place various features of a component relative to each other, such as a hole centre line to a reference surface.
  • Mating dimensions. Used for parts that fit together requiring a certain degree of accuracy.


Dimensioning conventions

General

Observe the dimensioning features shown for the plate in Figure below. Note:

  • parallel dimensions, indicating the size of the plate
  • edges A and B are being used as the reference edges
  • minimum number of dimensions required are specified
  • use of description of 'plate 3mm thick', so that no side view is required
  • evenly spaced dimension lines


Radii

Circles

Circles on engineering drawings are usually either spheres, holes or cylinders of some description. The dimension refers to the diameter, and the diameter symbol is ∅.
Holes equally spaced on a pitch circle can be dimensioned as shown below.
The ∅40 dimension can also be refereed to as the PCD or Pitch Circle Diameter.

Chamfers, countersinks and counterbores


Location dimensions

Due to the nature of manufacturing, actual finished dimensions of manufactured components are never perfect. This has to be considered when dimensioning features that require accurate location. In order to enable accurate measurement, such a feature is usually dimensioned from a reliable reference such as a machined surface. This reference is referred to as a Datum.


Figure above shows: 

  1. A spigot located from two reference edges.
  2. Two holes located from two reference edges.
  3. The large hole located from two reference edges and the small hole from the center of the large hole.
The simple bearing bracket casting below shows both size and location dimensions.


Surface finish

Surface textures resulting from manufacturing processes consist of many complex peaks and valleys varying in height and spacing. The Roughness value of a surface is a measure of this surface quality. The table below gives some nominal values of roughness resulting from various common manufacturing processes.

If a particular surface finish is required you give clear instructions on the drawing using the British Standard machining symbol.


Wednesday, July 9, 2014

Engineering Drawing - Part 3

Abbreviations of terms frequently used on drawings

Abbreviations are used on drawings to save time and space. Most of these conform to BS 8888. They are the same singular or plural, full stops are only used where word may be confusing.

A/C
Across corners
A/F
Across flats
HEX HD
Hexagon head
ASSY
Assembly
CRS
Centers
CL
Center line
CHAM
Chamfer
CH HD
Cheese head
CSK
Countersunk
CBORE
Counterbore
CYL
Cylinder or cylindrical
DIA
Diameter (in a note)
Ø
Diameter (preceding a dimension)
R
Radius (preceding a dimension, capital only)
RAD
Radius (in a note)
DRG
Drawing
FIG.
Figure
LH
Left hand
LG
Long
MATL
Material
NO.
Number
PATT NO.
Pattern number
PCD
Pitch circle diameter
I/D
Inside diameter
O/D
Outside diameter
RH
Right hand
RD HD
Round head
SCR
Screwed
SPEC
Specification
SPHERE
Spherical
SFACE
Spotface
SQ
Square (in a note)
TYP
Typical or typically
THK
Thick
Square (preceding a dimension)
STD
Standard
UCUT
Undercut
M/CD
Machined
mm
Millimeter
NTS
Not to scale
RPM
Revolutions per minute
SWG
Standard wire gauge
TPI
Teeth per inch

Sections

To show the inside details of a component it is imagined to be cut or sectioned along a plane, the cutting plane. Cutting planes are designated with capital letters, such as A-A in Figure 1 below. 

Figure 2


Figure 1

The side of the plane nearest the viewer is removed and the remaining details are shown as a sectional view, as demonstrated with section X-X in Figure 2. The arrows indicate the direction to view the component when defining the sectioned view. Note that First or Third angle orthographic projection systems are still used and are indicated by use of the appropriate symbols.

Sectional views are produced to:

  • clarify details
  • show internal features clearly
  • reduce number of hidden detail lines required
  • aid dimensioning
  • show cross-section shape -->
  • clarify an assembly


Surfaces cut by the cutting plane are usually hatched at an appropriate angle, say 45° with a density of lines in proportion with the component.

Symmetrical parts can be shown in half sections. Part or 'broken out' sections can be used.

Figure 4  Half section and a part or 'broken out' section.


Revolved sections are useful when clarifying local cross-section shapes as shown in Figure 5.

Figure 5
Figure 6  Web section

There are some exceptions to the general rules of sectioning:

  • Webs, see Figure 6.
  • Shafts, rods, spindles, see Figure 7.
  • Bolts, nuts and thin washers.
  • Rivets, dowels, pins and cotters.

These parts would not be shown as sections if their center lines lie on the cutting plane.
Figure 7
It may be appropriate to use Removed sections, for webs, beams or arms, as shown in Figure 8 below. Note the absence of viewing arrows.

Figure 8  Removed sections

Assemblies can be greatly clarified using sections. See the example as  shown below in Figure 9.

Note:

  • Revolved sections.
  • Part sections.
  • Different hatching directions and spacings.
  • Un-sectioned components such as shafts, keys, nuts etc.


Figure 9  An assembly drawing view, clarified using sections.